
Post by snyper on May 18, 2009 8:52:06 GMT 8
Pick a Pressure - Any Pressure - The SOKO Method for PCP Pressure Tuning.
This article is originally posted in the yellow forums. It can be found HERE
[/center]
First of all, I strongly suggest that anyone interested in tuning their Marauder - or indeed any PCP equipped with an adjustable hammer strike (spring preload and/or stroke length) - first read the nice writeup posted previously by the Ateam: www.network54.com/Forum/79537/thread/1242439453/Marauder+Tuning+Information....
This writeup of mine is in no way intended to contradict or supplant theirs, but only suggest another way of looking at and (hopefully) optimally organizing the tuning process by adding a little theory and mathematics. The practical tips Ray and Hans provide for setting up gun and chronograph for consistent velocity measurement, charging, interpretation and setting of the Marauder adjustments, are invaluable no matter what method you use - theirs or mine. Recommended reading!
Then here goes - tuning with SOKO.
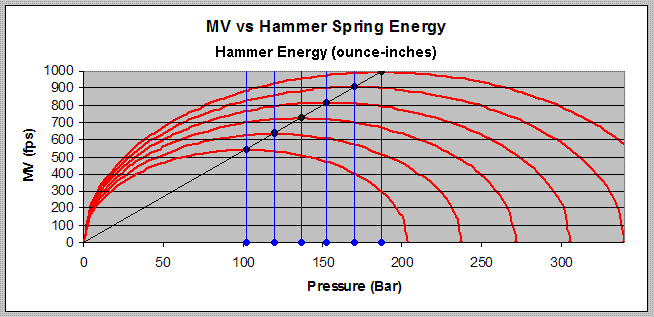
The Method
The tuning recipe that follows is based on SOKO (Second Order Knock-Open) valve theory, which has been discussed here many times before. Those interested can find details in threads like this: www.network54.com/Forum/79537/thread/1144941683/How+and+Why+Does+Hammer+Spring+Preload+Affect+Muzzle+Velocity-
Step 1: Pick a Fill Pressure: Pfill.
The relative advantages of high fill pressures versus low is such well trodden ground that I won't attempt to revisit it, except for mentioning two very general - and obvious - truths:
Higher fill pressures provide more potential for higher power and more shots-per-fill.
Lower fill pressures provide more flexibility and efficiency in utilizing a variety of air sources.
Subject to those two general principles, the tuner is free to choose any fill pressure that is (of course) within the max pressure rating of the gun.
Step 2: Pick a peak velocity: MVp.
The advantages and disadvantages of high velocity vs low are mostly obvious and won't be discussed here.
Step 3: Pick a velocity spread: Vx.
Velocity spread is inversely related to accuracy (spread = bad) - especially at long range - and directly related to shots per fill (spread = good). Velocity spread is therefore always a compromise between precision and efficiency/convenience. Realistic choice of spread is aided by plots of POI shift vs velocity like this one.

Step 4: Calculate velocity spread percentage: V% = 100 * Vx / MVp.
Step 5: Calculate minimum velocity: MVmin = MVp - Vx.
Step 6: Calculate recharge pressure: Prchg = Pfill * X, where X is a function of V%, taken from the table below.
V% - X
1 -- 0.79
2 -- 0.71
3 -- 0.66
4 -- 0.62
5 -- 0.58
6 -- 0.55
7 -- 0.53
8 -- 0.51
9 -- 0.50
10 - 0.49
Step 7: Charge to Prchg pressure, shoot and record the velocity as MV1.
Step 8: Charge to Pfill, shoot and record the velocity as MV2.
Step 9: If MV2 = MV1, then proceed to Step 13.
Step 10: Calculate MV3 = MV1 + MV1 - MV2.
Step 11: If MV2 faster than MV1, then decrease hammer strike energy and take test shots until MV = MV3.
Step 12: If MV2 slower than MV1, then increase hammer strike energy and take test shots until MV = MV3.
Step 13: Adjust the transfer port (if the gun is equipped with an adjustable one) and take test shots until MV = MVmin. If you find you've adjusted the port to wide open and still can't reach the desired velocity (or if the gun doesn't have one), then the chosen velocity is beyond the capability of the gun for the pressure range you picked. You'll therefore need to choose a higher Pfill and/or a lower MVp and start the whole tuning process over from Step 1.
Step 14: Shoot a complete MV shot-count string.
Step 15: If satisfied with the resulting shot-count curve, you're done. Otherwise repeat from Step 7.
I'm sure I messed something up - so comments are invited.
Steve
Air Conserving MSP 392
GTX Generation II 2-Stage Trigger
Benjamin SuperSear
Crosman Custom Parts
Big Ed Airguns
